|
|
Post by bilbo63 on Feb 26, 2021 21:24:17 GMT -5
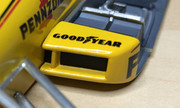
Pretty much ready for decals, then some clear. Tires are ready to go. Mirrors are ready. (both of them, LOL) Oh, and on that note, I found the second mirror for the Sullivan Miller High Life car so I can finally add those. If I was doing this kit again, I would definitely use a white primer rather than grey, I used an entire bottle of yellow on this! So far, so good.   |
|
|
|
Post by illeagle10 on Feb 27, 2021 6:27:10 GMT -5
Looks like you're pretty close to getting this one done Bill!
Jim
|
|
|
|
Post by gks1964 on Feb 27, 2021 6:57:52 GMT -5
Looking really good!!!
Gerald
|
|
|
|
Post by Dan Belcher on Feb 27, 2021 12:22:06 GMT -5
Well, it may have taken a lot of paint, but at least it's looking nice. Primer definitely makes a big difference with most colors of paint. I generally would stick with white primer for anything other than black or really dark colors, unless I know that I need the color of the paint to be a bit darker and more muted than normal.
|
|
|
|
Post by bilbo63 on Feb 27, 2021 14:34:56 GMT -5
Well, it may have taken a lot of paint, but at least it's looking nice. Primer definitely makes a big difference with most colors of paint. I generally would stick with white primer for anything other than black or really dark colors, unless I know that I need the color of the paint to be a bit darker and more muted than normal. While putting it together, I noticed that the rear wing looks slightly darker and really could have used a 5th coat of yellow, which I would have done if I had any. The paint is inexpensive, that wasn't the issue. It was just that I ran out. I should have bought two bottles to be on the safe side. The hobby store where I order my supplies is out of the yellow. I just fixed one of the push rods that came dislodged then I'll continue with the decal work. Those fine stripes can be pesky buggers! One stripe did not hold up too well. Probably from me trying adjust the position after it had begun to set up. I emailed Michael at IndyCals for a replacement. Thank god for Ooops Protection! I also ordered a set of new decals for my next build, so hopefully they can just go out together. This snag will hold things up a little bit on this one, but I'd rather wait and have it right. A few "firsts" for me on this build. - Separating the lower nose portion and suspension arms from the floor pan for the nose-job work
- Heat staining the headers
- Spark plug wiring
- Valve Stems
- Bare Metal Foil work at the back of the engine cowl
I see a few things here and there that I wish I had done better, but at the end of the day, I've again taken a few steps forward and learned some new things. Overall, I am pretty happy with this build, it just sucks having to wait on decals. Bill |
|
|
|
Post by illeagle10 on Feb 27, 2021 17:28:41 GMT -5
Bill, that's what really counts is that you're happy with it. Modelers as a norm are always harder on themselves than others, except for judges at a model show! LOL! The important things is that you are progressing well with each model build. I always cut off suspensions and then add them later. If you're going to do a resin such as Bill Jorgensen's Resins or one of Calvin's your going to have to mount them like that anyway. By removing the suspension it makes it so much easier to get rid of those unsightly seams out of the tub, which gives the model a truer more realistic look.
Jim
|
|
|
|
Post by bilbo63 on Feb 27, 2021 18:13:46 GMT -5
I totally agree Jim. Overall, I am quite happy with this one and each new build was better than the one before it. B   |
|
|
|
Post by illeagle10 on Feb 27, 2021 19:49:57 GMT -5
I see you're missing a little bit of decal on the noise stripe. That's an easy fix Bill. One tip, when I am set on a build I always buy two or three sets of decals, just in case. You can do one of two things. If you just put the decal down you might be able to remove the stripe by using masking tape and then laying down another decal. You can also just lay another decal down over what you have if your a little finicky on trying to pull up decals, but you'll have to be very precise so that you are right on top of the other decal. I've had success both ways over the years. Me, I prefer to just pull the old decal off with a thin strip of masking tape and start over again. Keep up the good work!
Jim
|
|
|
|
Post by bilbo63 on Feb 27, 2021 20:02:27 GMT -5
I see you're missing a little bit of decal on the noise stripe. That's an easy fix Bill. One tip, when I am set on a build I always buy two or three sets of decals, just in case. You can do one of two things. If you just put the decal down you might be able to remove the stripe by using masking tape and then laying down another decal. You can also just lay another decal down over what you have if your a little finicky on trying to pull up decals, but you'll have to be very precise so that you are right on top of the other decal. I've had success both ways over the years. Me, I prefer to just pull the old decal off with a thin strip of masking tape and start over again. Keep up the good work! Jim Yeah, that's on me. Michael from IndyCals is sending me another set with my Newman Haas Lola T93 decals that I ordered. Buying two sets is probably a good practice. I struggled with those long fine stripes. |
|
|
|
Post by Dan Belcher on Feb 28, 2021 9:30:03 GMT -5
All this info might be overkill for what we're talking about here, but eh, might as well share my findings LOL. What I've started doing that has helped me with applying decals... 1) Smooth paint is the only way to get decals to really lay down nice. Lightly sand between coats of paint to keep things as smooth and level as you can, and I use Tamiya polishing compound to get a really nice, smooth surface since those don't include any wax, they're just mild abrasives. Wash with dish soap and water to get any gunk off before decaling. Now, I hadn't figured out my method on my IndyCar models I've done so far, but lately on my last couple models I've cleared the model before applying decals (more realistic looking for the NASCAR builds at least anyway) and I've used Tamiya polishing compounds to get a really smooth finish on the clear coat. I've even heard of people clearing both before and after decals. Up to you. 2) I microwave some distilled water it until it's pretty hot. This helps the decal come off the backing really easily and makes the decal just seem to be a bit easier to work with. 3) I actually dab a little of the water onto the model where I'm going to be putting the decal. Depending on the decal and how tricky it's going to be, I'll also put a little bit of Micro Set on a paintbrush and when I'm sliding the decal off the backing I'll have the paintbrush in between the model and the decal so it gets a little on both. This helps give a nice lubrication to the decal and lets me slide it into place easier, and it helps soften the decal to go down even better around any corners. 4) Smooth out to wipe out any air bubbles using a damp paper towel or wet paintbrush, then wipe off any excess glue/Micro Set to avoid discoloration. 5) Solvaset is your friend if you need to get the decal to go around substantial curves. Just be gentle, that's strong stuff! All that said... I still end up messing up a couple decals here and there... went through two sheets on my Davey Allison build and still had a couple that I mildly screwed up even on both attempts...  |
|
|
|
Post by bilbo63 on Feb 28, 2021 10:19:13 GMT -5
Good suggestions Dan. The orange peel and such that is visible in the photos is quite exaggerated due to the built in image sharpening of my camera. With that said, getting a better paint finish is an area where I want to improve so I am grateful for the tips.
(it's also nice to know that even you guys mess up at times…I don't feel so bad!)
|
|
|
|
Post by bilbo63 on Feb 28, 2021 16:35:54 GMT -5
|
|
|
|
Post by shunter on Mar 1, 2021 4:54:24 GMT -5
Looking good, these colours are always winners
|
|
|
|
Post by bilbo63 on Mar 1, 2021 14:15:17 GMT -5
Agreed, I love this car! Mears was my favourite driver back then. I have just loosely placed the wheels in position for now. After I fix up the minor decal mishap, I'll shoot it with clear and then glue the wheels on. I also need to add the mirrors, but I just learned about CA Accelerator so I will wait until I get some. How did I miss that?! I can see it being very helpful when attaching mirrors and such. I still have a just wee bit of detail touch-up that I want to do, but I think I'll leave it like this on the shelf with the others for now. It appears to sit a bit high in the front. I'm guessing, I didn't get the nose glued back on in exactly the right position, or it shifted on me before it finished setting up. It's not off a ton, and only me and you guys would even pick up on it. I also used some Dull-Cote on the tires on this one and like the result. I am pretty darn happy with how the nose turned out without the seams and fit problems that I had on the Sullivan car. Thanks to Dan for encouraging me to push my skills forward and "go for it". Overall, I am really pleased with it! It's not perfect, but I think it looks pretty clean and being an Indycar fan, it's nice to display in my home office. They really bring back memories of the first four Molson Indy Toronto weekends that I attended. On the Friday before the race, I saw Rick Mears at a distance by his car in the garage area, but by the time I got over there, he was gone. I was hoping to meet him and get an autograph. That guy is stealthy–like a ninja! LOL Moments later, AJ Foyt called my 10-year old nephew over and signed his hat for him. AJ was really nice and chatted with him for a few minutes. Again, I appreciate the tips and encouragement that I have received on these boards. I see a steady improvement in my abilities across these three builds. Sadly the subtle blue and yellow hues of the heat-staining didn't come through very well in the picture. Even the yellow of the car itself looks washed out compared to how it really is. Bill  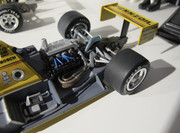 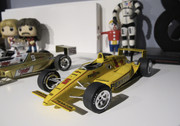 |
|
|
|
Post by gks1964 on Mar 1, 2021 19:10:36 GMT -5
Nice job!!
Gerald
|
|